This is certainly a situation we have all encountered at least once when faced with our wardrobes, looking at the same clothes as ever and finding everything somewhat monotonous.
Recently, there has been a huge trend of nostalgia coupled with the necessity to adopt more sustainable ways of dressing. Thus, bespoke fashion customisation has made a tremendous comeback in the UK.
There is nothing quite as exciting as making an ordinary item of clothing into something unique and meaningful, which says a lot about who we are, where we have been, or even our favorite music bands.
This is the point where the importance of custom clothing decoration comes to its full value. In case you have been looking for some practical advice on how to iron on patches, then you are in luck because you have come to exactly the right spot.
Taking an ordinary mass-produced piece of clothing and transforming it into something extraordinary does not demand any expertise in fashion design or access to an expensive sewing machine.
Understanding the Basics of Heat-Activated Adhesive for Iron on Patches
While we may just go ahead and jump straight into the process, it is crucial that we take some time to first educate ourselves about the basic principles underlying the whole procedure.
An iron on patch will always be characterised by its reverse side being very stiff and having a very shiny, plastic-like finish. This is basically a special adhesive that will only become effective when it comes into contact with the heat produced by your domestic iron.
The stiff glue will melt and bond itself with the woven fibres of the cloth once it is melted down. But it must be noted that there are different types of cloth out there, and knowing this basic fact will be key to learning how to apply iron on patches effectively.
Natural fabrics such as thick cotton and denim are the best base for this glue since they can handle the immense heat needed for this without burning up. But polyester is sensitive and can melt under immense heat.
Preparing Your Workspace and Gathering Your Tools
The first thing that needs to be done before beginning the ironing process is the preparation. It separates the successful procedure from the one ending in failure. There is no doubt that just sticking any patch to any jumper would be a wrong step to make.
In order to learn how to iron on a patch correctly, it is imperative to acquire several items. First, you will need your garment, an ironing board, an iron that provides sufficient heating, and finally, a pressing cloth.
One should not underestimate the importance of the last item mentioned. Any old tea towel, pillowcase, or scraps of muslin will suit you well enough. The purpose of this piece of fabric is to serve as a layer between your very hot iron and delicate fibers of your design.
That is why the pressing cloth becomes an effective means of protecting your patch from melting under the influence of high temperatures. In case you are working with sophisticated designs and want to learn how to iron on embroidered patches, it would be silly not to use it.
The Crucial Preparatory Steps for Your Garment
With all the necessary tools arranged on hand, you should get ready for working on the canvas. First, wash your clothing item and dry it. Garments bought brand new from any fashion house are usually treated with invisible chemical substances such as sizings and softeners to make them impermeable to adhesion.
After your piece of clothing is clean and dry, set it on the ironing board. Heat your iron at the highest temperature suitable for your garment without enabling its steaming function. Steam and water are absolutely incompatible with melted glue.
Therefore, it is important to keep your ironing surface dry. Apply the hottest part of your tool to the area where your badge is going to be ironed. This way, you will ensure that there is no water left on the surface.
Moreover, the fibers of your textile will loosen and become more receptive to the glue. When asked how to iron on badges, we always remind people of this crucial pre-heating phase.
The Master Technique for Flawless Application of Iron on Patches
Here comes the part that will put all your hard work to test. Slowly place your design over the newly warmed spot on the fabric. Make sure it is placed perfectly straight, because once the glue hardens, moving it even slightly will not be possible.
Now, if you have always been wondering how to iron on an iron on patch for clothes, you should know that it is all about pressure and patience. Cover the design with your special pressing cloth and make sure you don’t disturb it.
Pick your iron and place it firmly onto the cloth covering the design without lifting it from one spot. Do not rub the iron as if you were ironing wrinkles. By moving your iron over it, you will only distort your design and smear the glue.
What you need to do is press down the iron firmly by putting pressure from your entire body weight. Leave it in one place for approximately fifteen-twenty seconds. Then remove it and repeat it wherever it may be necessary. Knowing how to iron on iron on patches correctly is the first step to correct patching.
Securing the Bond from the Reverse Side
But wait, there is one more crucial step to ensure durability. Take off the pressing cloth and give the area some time to cool down so that you do not burn yourself. Turn the garment totally inside out.
It is important at this stage to absorb as much melted glue deep into the fibres of the fabric as possible. Place the garment on the ironing surface so that the back side of the place where you have attached the design faces up.
Iron that part of the fabric for another fifteen seconds with a hot iron. In most cases, the pressing cloth is not needed at this point, except if your shirt or T-shirt happens to be very delicate.
In doing this, you will be forcing the glue deeper into the fabric through its weave, making the connection between the two materials extremely strong and durable. This is how to iron an iron on patch like a professional!
Customising Your Favourite Shirts
The most common type of clothing that tends to be popularly used for customisation is shirts, ranging from a regular flannel shirt and button-down shirt to t-shirts. Iron on patches on shirts need care about the fabric mix of the particular item.
Standard t-shirts usually have a mix of either cotton or sometimes cotton blended with polyester, which makes them able to resist high temperatures for attaching an iron patch on shirts.
As compared to outer garments, shirts are made from much more delicate materials, hence the need to ensure that the surface on which you will be ironing is completely flat and rigid.
You should always take extra caution whenever you wish to iron on a patch to a shirt, owing to the flexibility of the fabric. When placing the designs, one must ensure that the fabric is not stretched in any way, thus leading to wrinkles after the glue dries up.
In case one wants to know how to apply iron on patches safely on the shirt pocket, one can easily put a card in between before ironing so that the shirt pocket does not stick to the actual shirt.

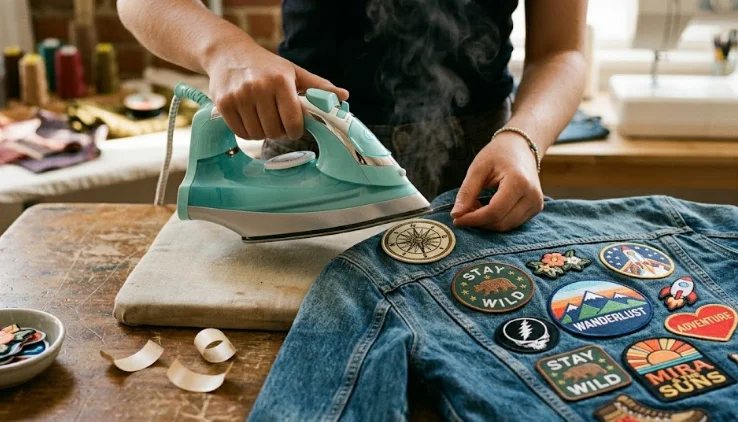
Tackling Tough Denim and Heavy Jackets
Denim is the king of customisable clothing beyond any question. Denim, in whatever its incarnation. Be it the Levi’s jacket from the past decade, a perfect pair of worn-out jeans, or the brand-new pair that has not had enough time to become worn out yet. They are awesome fabrics that give you excellent canvas.
However, owing to the thickness and tight weaving of denim cloth, how to iron on patches takes some modification in terms of the time required for pressing. Heat needs much more time to pass through all these dense blue threads and get to the adhesive substance under the patch.
In case you need to iron on patches for jeans or iron patch on thick denim jackets, feel free to increase the pressing time and give each portion at least thirty seconds under your iron. Moreover, do not hesitate to use some additional pressure, since it can only help you get better results.
If you choose to iron on patches on jeans, especially in places such as pockets or knees, which constantly bend and flex during the day, reversing the process mentioned above becomes essential. Otherwise, the edges of your design would start lifting after a few days of wearing the pants.
The Tricky Business of Synthetic Fabrics
Today’s clothes contain a great deal of synthetic materials, posing another set of problems. Should you want to iron on patches on polyester, nylon, or any sportswear, you will have to take care. Polyester is, quite literally, plastic.
If you apply a very hot iron to it, not only will the polyester fabric deform, melt, or burn shiny before anything, but most likely before the custom iron on patches even becomes bonded. In order to safely attach an iron on embroidery patch to polyester fabric, you will have to set your iron on a medium or “synthetic” setting.
Since it is low heat, you will have to hold your iron over the glued area longer to melt the glue. Make sure you have a thick pressing cloth. Do not forget to monitor the process.
For things such as raincoats or workout gear, you may be planning to attach iron on appliques just for looks. Here, if your polyester is so sensitive that it cannot endure medium heat, it is best to completely forget about iron and sew the patch edges instead.
Creative Solutions for Those Without Traditional Tools
Life goes by, and sometimes you end up traveling, attending a festival, or living in a university residence hall without having an iron at home. You can be desperate enough to mend your garment or add a stylish new patch to it, prompting the question: How to iron on a patch in a crisis situation?
Luckily, there is a way to iron on patches without an iron, using only hair straighteners. Hair straighteners function as a perfect double-sided mini press. You simply need to put the design exactly where you want to have it on the sleeve, collar, or hemline of your clothes.
All you need to do is to heat your hair straighteners, put a very thin protective cloth layer on the patch, and put the heated ceramic plates down on the back and front side of the fabric at once. You should hold it for about twenty seconds.
In case one needs to attach an iron on a badge to the center of the shirt in such a position that it cannot be reached by any other straightener, the usage of good-quality washable fabric glue can be considered to be an excellent substitute for trying to iron on a patch without an iron. One just has to apply the glue to the backside, put it on the fabric, keep something heavy on it overnight, and the job is done.
Ensuring Your Custom Creations Last a Lifetime
After ensuring that you manage to iron a patch on the garment properly, then it follows that you will want it to remain firmly attached for many years to come. In other words, you should be able to take good care of your iron on patch items.
Always ensure that any time you are washing your customised T-shirts, pants, jackets, and others, you turn them inside out as you place them in the washing machine. This will help to prevent your embroidered threads from being snagged by zippers and buttons.
Furthermore, it stops the washing machine’s agitator from being too rough in its movement as it washes your customised apparel. Here, it is important to wash your bespoke garments in cold water through gentle washing cycles since hot water may reactivate the glue and make your design come off.
In addition, you should avoid placing your bespoke garments in the tumble dryer since it is quite hot, thus making the iron on embroidered patch peel off. Air dry your bespoke clothing, such as jeans, shirts, and jackets, by hanging them outside or inside on the maidens. These tips, if followed, prevent iron patches from falling off.
Frequently Asked Questions
Can I easily remove a design once it has been firmly ironed onto my clothing?
Heat-activated adhesive is permanent but may be removable with patience. Reheat with an iron and pressing cloth to soften the glue, then use tweezers to peel away the design. Expect stubborn residue that may need specialised fabric adhesive removers for complete cleaning.
Why are the intricate edges of my design starting to lift and peel away after just one wash?
Premature lifting of edges typically indicates insufficient heat or inadequate pressure during application. Another reason may be ironing the fabric’s front instead of the reverse. You can fix this by flattening the garment and re-ironing with a pressing cloth.
Should I use the steam setting on my iron to help the heat penetrate the fabric better?
Never use steam when applying adhesive-backed designs, as moisture disrupts hot melt glue bonding. Ensure the iron’s water reservoir is empty and the steam dial is off for proper adhesion.
Is it strictly necessary to sew the edges down after I have already ironed the design firmly in place?
Using high-quality adhesive is effective, but adding simple stitches around the outer border is recommended for items experiencing heavy wear. A quick running stitch can provide extra security, ensuring designs remain intact despite glue weakening over time.
Learn How to Iron on Patches with Patch Makers UK
Tailoring your clothes with a custom design is an innovative way to give them a whole new lease of life and highlight your distinctive fashion sense. With the help of these tips that will guide you in how to iron on patches just like a pro and knowing how to work with difficult fabrics and form durable bonds, your only restraint is your imagination.
For those of you who have been struck by inspiration and are ready to embark on their next project, discover our huge range of high-quality designs at Patch Makers UK. At Patch Makers UK, we are proud to offer you the finest quality designs that are highly durable and very easy to apply.