Let’s be honest, there’s nothing more awkward than standing over your fresh new patch with a hot iron in hand, praying to the polyester gods you don’t ruin your hoodie. It’s even worse when you’ve got no idea if that patch is iron-on or not. Will it stick like a dream? Or sit there like a lazy loaf?
If you’ve ever ordered custom patches online or rifled through your growing collection of embroidered goodies, you’ve probably asked yourself: “Is this thing even iron-on?” You’re not alone.
With hundreds of custom patch styles floating around, from iron-on, sew-on, Velcro, and adhesive-backed options, knowing what you’ve got is half the battle. Lucky for you, we’re spilling the thread.
Whether you’re prepping a custom logo patch for your bomber jacket or dressing up your team’s workwear, here’s exactly how to tell if your patch is iron-on, without melting your fabric or your sanity.
First: What Is an Iron-On Patch, Anyway?
Iron-on patches are basically the “instant noodles” of the patch world, quick, easy, and ready to serve. They come with a heat-activated adhesive backing that bonds to fabric when you apply heat (usually from a household iron). They’re wildly popular among people who love DIY, hate sewing, or both.
Iron-on is a standard for many who buy custom patches online, especially for corporate apparel, scout groups, or fashion merch drops. But not all patches are created equal. So, how do you decode yours?
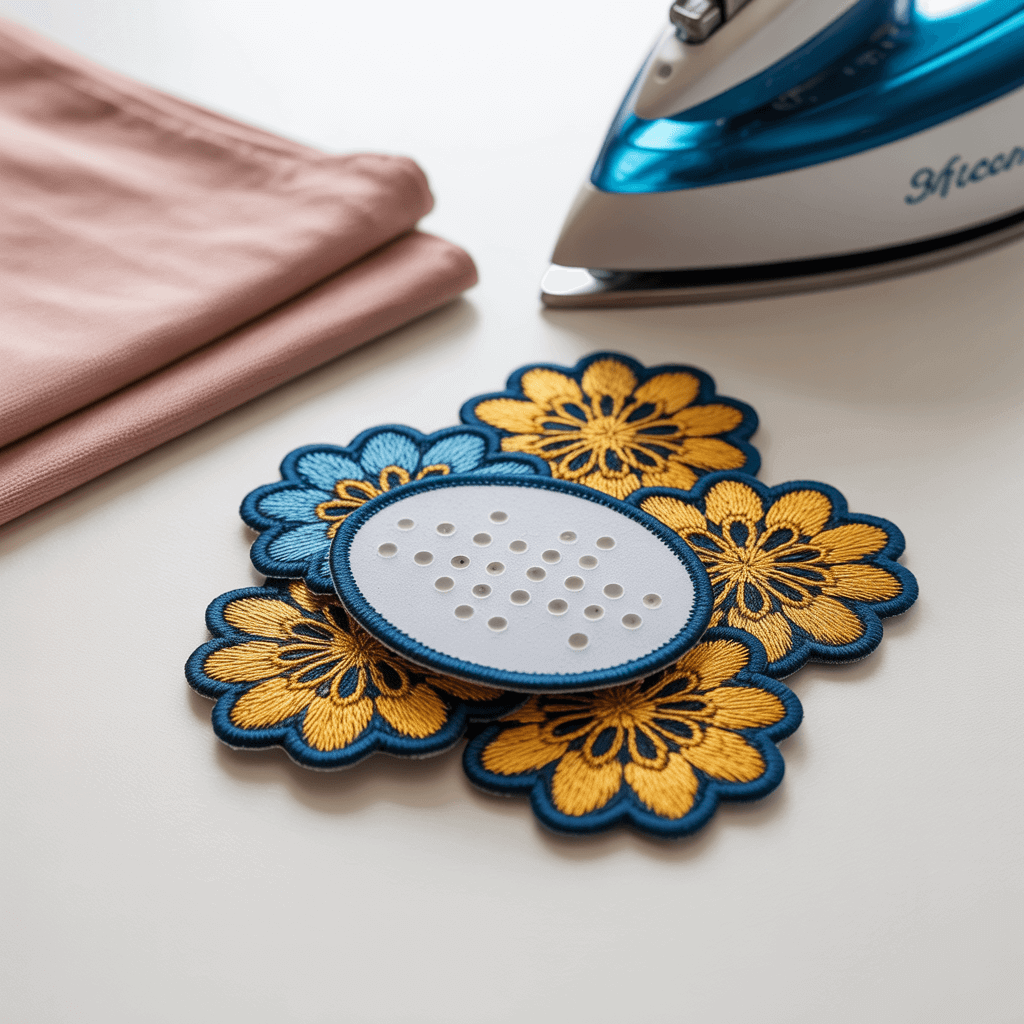
1. Flip It Over – The Back Tells the Truth
The back of a patch is the biggest giveaway. Turn your patch over and inspect it like you’re on an episode of Patch Detectives.
- Iron-On: Has a slightly glossy, plastic-like sheen. It’s smooth to the touch, almost waxy or shiny.
- Sew-On: Has a cloth-like or fabric texture on the back. No shine. Just feels like… well, fabric.
- Velcro-backed: Usually has a black, fuzzy loop or rough hook side attached, so obvious, it doesn’t need inspection.
- Sticker-backed: Peels like a sticker. If you’re peeling, you’re dealing with adhesive, not iron-on.
When you’re working with high quality embroidered patches made in the UK, that subtle shiny layer is your telltale sign it’s ready for heat.
2. Touch Test: Feel for the Film
Still unsure? Rub your fingers along the backside of the patch. Iron-on patches typically feel:
- Slick
- Slightly stiff
- Not soft like the rest of the fabric
If the patch feels like it’s had one too many layers of hairspray, it’s probably iron-on.
3. Stitch or Stick? Look for Factory Hints
Some embroidered patch makers or online vendors will label the backing type on packaging. If you’ve ordered through a trusted custom patch maker near you, like us over at Patch Makers UK (ahem), you’ll see clear instructions.
Still guessing? Try a corner. Place a cloth between the iron and patch, apply heat, and check if it starts bonding. If not, congrats, it’s probably sew-on.
Warning Signs That It’s Not Iron-On
If you notice any of these, back away with the iron:
- Loose threads along the border
- Fluffy or fuzzy back
- No glossy finish
- Super soft underside
Trying to iron these can result in disaster. You might melt the thread or worse, warp the patch beyond repair.
Why Does It Even Matters?
Short answer: heat ruins things. If you’re working with synthetic garments, iron-on patches for polyester require precise temperature control. Going in blind? Risky.
Knowing if it’s iron-on helps avoid:
- Burnt patches
- Melted clothing
- Wasted time
Not to mention, some fabrics just don’t hold up to heat, especially materials like rayon, nylon, or stretch blends. (Yep, those stretchy joggers are not patch-friendly.)
Choosing the Right Patch for the Right Occasion
Some patches are built for display, others for durability. For example:
- Custom iron-on patches are great for fast branding on polos or casual uniforms.
- Sew-on options work better for jackets or high-wear gear like biker cuts and denim.
- Velcro styles are ideal for military units, team badges, or promotional swag you need to swap.
Want help designing the perfect combo of style and functionality? Tap into our full range of patch styles and customization options for every need, from corporate logo patches to custom flag patches and beyond.
A Patch Panic? Not On Our Watch
Too many patch fans learn the hard way. One bad iron job and boom, your once-crisp custom embroidered patch looks like a sad tortilla chip.
Before you commit patch to cloth, it pays to know what you’re working with. If you’re in doubt, we always recommend checking out our step-by-step guide on how to iron-on patches, complete with temp settings, fabric warnings, and pro tips.

Looking to Order? Go With Pros Who Know Backings
We’ve been in the patch game long enough to know that half the battle is prep. At Patch Makers UK, we don’t just hand you a patch and wish you luck. You’ll get:
- Expert backing advice (iron-on, sew-on, Velcro)
- Fast production and shipping across the UK
- Guidance tailored to fabric, garment, and use case
Thinking of a rush order for your team’s workwear? Or maybe you’re looking to design your own custom patch and order in bulk? Either way, we’ve got your back (and your jacket’s).
And in case you’re still unsure what patch type fits your project, you can always reach out, we don’t gatekeep good patch advice.
Can You Iron On to Polyester? Yes, But You’ve Gotta Do It Right
Polyester’s the lightweight MVP of activewear, work uniforms, and branded merch. But it’s also a diva when it comes to heat. The fabric can melt, scorch, or warp if you’re not careful. That’s why knowing how to handle iron-on patches for polyester is crucial.
So what’s the sweet spot?
- Set your iron to low-medium heat (110°C–135°C)
- Use a pressing cloth or parchment paper between the patch and iron
- Press, don’t slide. Hold for 15–20 seconds, then lift and check.
Overdo it, and your patch turns into a bubbly pancake. Underdeliver? It peels right off. Think of it like cooking bacon: low, slow, and with supervision.
Looking for a patch that sticks flawlessly even on poly gear? Our custom iron-on patches are made with melt-proof adhesive backings, perfect for branded jackets, hoodies, and uniforms.
Other Ways to Know If a Patch is Iron-On: The Deep Dive
Here’s a fun tip most folks don’t know: Use a flashlight. Hold your patch up to a strong light source. If the backing reflects light with a sheen or gloss, it’s likely an iron-on. If it doesn’t? That’s a big nope.
Also, don’t overlook the smell test. (Yep, it’s weird but it works.) If you warm the patch slightly (say, with a hairdryer), iron-on adhesives give off a faint plastic scent. Sew-ons won’t.
Still unsure? You might be dealing with something trickier like a custom sublimated patch or PVC patch. These don’t follow the same rules. That’s when a patch maker with real expertise comes in clutch.
When It’s Better Not to Iron
If your patch is rare, vintage, or costs you more than your last takeaway dinner, don’t mess around. Some pieces are better off sewn. Especially:
- Patches with metallic threads
- Older patches with dried adhesive
- Patches on heat-sensitive fabrics like silk, leather, or spandex
Also, if you’re trying to customize bags or caps, stick with custom Velcro or sew-on patches. Ironing these surfaces can destroy the structure and let’s be honest, a warped baseball cap is a sad cap.
Troubleshooting: Iron-On Failures and What They Mean
So you tried it and the patch didn’t stick. No sweat. Here’s what could’ve gone wrong:
| Problem | Likely Cause | Quick Fix |
| Patch peels at edges | Not enough heat/time | Repress with firm pressure |
| Patch lifts completely | Wrong fabric (e.g., nylon or leather) | Try sewing or use fabric glue |
| Patch bubbles or wrinkles | Heat too high or iron moved | Use pressing cloth + steady hold |
| Adhesive sticks to iron | No protective layer used | Clean iron, use parchment or cloth next time |
Already dealt with lifting issues? We’ve got a full guide on how to prevent iron-on patches from falling off that can help you out.
Pro Tip: Use Both Heat & Stitching (The Hybrid Method)
Want peace of mind? Use the hybrid method: iron the patch in place to secure position, then add a few hand stitches around the edges. It adds durability, especially if your patch is going on gear that gets regular washing or friction.
This combo works great on:
- Work uniforms
- Scout patches
- Biker jackets
- Event or brand promo wear
Ordering for a team, club, or event? We offer bulk custom patches at low prices, including hybrid-ready designs that hold up under pressure.
The Final Iron Word
So next time you’re staring down a patch and wondering if it’s iron-on, remember: the answer is right in the back. Literally.
If you’ve got a polyester jacket begging for a brand moment or a tee just waiting to be upgraded, don’t wait. Use this guide, test your patch, and make it count.
And if you’re still second-guessing? Drop our team a line, we’ll help you sort it without the guesswork. After all, we’re not just another custom patch factory, we’re the best patch makers in the UK, and we’ve got your back (and your fabric).