You know that feeling when something handmade just hits different? A cross stitch patch does exactly that. It is not mass-produced, not soulless, and definitely not boring. It is personality, patience, and pride stitched into fabric. In a world drowning in fast fashion, cross stitch patches are the quiet rebels. Thoughtful. Textured. Properly charming.
Whether you are stitching for fun, flexing your creative muscles, or testing the waters before ordering custom embroidered patches from the best patch maker in the UK, this guide breaks it all down. No waffle. No textbook fluff. Just practical DIY steps, clean finishing methods, and durability tricks that actually work.
Key Takeaways
- A cross stitch patch is a handcrafted alternative to machine embroidery, offering character and custom flair.
- With the right fabric, thread, and finishing methods, DIY patches can last for years.
- Cross stitch patches are ideal for jackets, hats, bags, hoodies, clubs, teams, and events.
- DIY is rewarding, but when time matters, working with a custom patch maker in the UK saves effort and guarantees consistency.
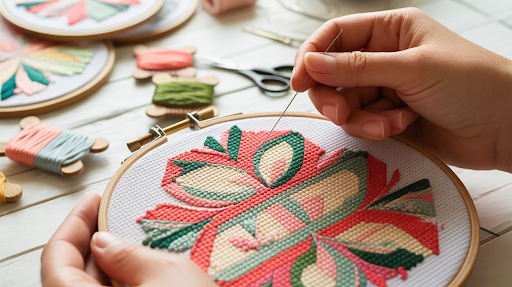
What Is a Cross Stitch Patch?
A cross stitch patch is a small stitched design made using X-shaped stitches on even-weave fabric. Think of it as pixel art with soul. Unlike dense machine embroidery, cross stitch has a lighter texture and a handcrafted look that feels personal and intentional.
These patches are popular for:
- Club member’s patches
- Personalised fabric patches
- School mascot patches
- Custom logo patches for jackets, hats, and bags
- Festivals, events, and small businesses
They are brilliant for creative expression, but they also teach you one very important thing quickly. Handmade takes time. And that is exactly why many people later choose to buy custom patches online from a trusted UK patch company with free shipping.
How Can You Make a Cross Stitch Patch Step by Step?
Let’s get into the nitty-gritty. This is the DIY backbone.
1. Choose the Right Fabric
Start with even-weave fabric. Aida cloth is beginner-friendly and forgiving.
- 14-count Aida gives a bold, pixel-style look
- 18-count Aida offers finer detail for smaller patches
Fabric choice matters more than most people think. If durability is your goal, it is worth learning what professionals use. This guide on Best Fabrics & Threads for Long-Lasting Embroidered Patches explains it properly and is worth a read.
2. Pick a Pattern That Makes Sense
Do not get cocky on your first go. Simple shapes, clean lines, and limited colours win every time. Cross stitch rewards patience, not ego.
3. Stitch from the Centre Out
Always start from the centre of your design. It keeps everything aligned and prevents the dreaded crooked patch situation.
4. Maintain Even Tension
Loose stitches sag. Tight stitches pucker. Neither is a vibe. Keep your tension consistent and take breaks if your hands start behaving like they have had too much tea.
5. Outline Your Design
Once the main design is done, add a border using backstitch or half-backstitch. This step is non-negotiable if you want a patch that looks intentional rather than accidental.
6. Trim and Back
Cut around the border carefully, leaving a small margin. Add backing such as felt, interfacing, or iron-on adhesive depending on how you plan to attach it.
This process is how most people learn to make sew on patches for clothes at home.
What Supplies Do You Actually Need?
No need to raid a craft shop like it owes you money. The basics will do.
- Aida cloth or even-weave fabric
- Cotton embroidery floss or polyester thread
- Tapestry needle
- Embroidery hoop
- Sharp scissors
- Felt or iron-on backing
If you are aiming for professional-level results, the difference always comes down to materials. Cheap supplies show their age fast. That is why brands working with high quality embroidered patches made in UK never cut corners.
How Do You Create a Clean Outlining Border?
A border does three things. It frames the design, prevents fraying, and makes trimming stress-free. Use backstitch for sharp edges or half-backstitch for curves. Keep the border at least two to three squares away from your design. Any closer and you are living dangerously.
A strong border is what separates a hobby patch from something that could sit proudly next to custom iron on patches made by professionals.
Switching Threads Without Making a Mess
Thread changes can ruin the back of a patch if done badly.
- Never knot your thread
- Secure ends by weaving them under existing stitches
- Let your needle dangle occasionally to release twists
Planning colour sections ahead of time reduces thread switching and keeps your fabric stable.
Finishing Methods That Actually Last
This is where most DIY patches fail. Finishing is not glamorous, but it is everything.
Backing Options
- Felt for flexibility
- Fusible interfacing for structure
- Iron-on adhesive for convenience
Once backed, press lightly with a low-heat iron. Do not squash the texture. You are not making toast. For extra durability, whip-stitch or blanket-stitch around the edges. This trick is borrowed straight from how custom patches made in the United Kingdom are finished for long-term wear.
Why Testing Your Patch Is Not Optional
Testing saves heartbreak. Always stitch a small sample first. Testing helps you check:
- Colour contrast
- Stitch clarity
- Border spacing
- Backing behaviour
If the patch is destined for washing, pre-wash your fabric and thread. Nothing kills a good design faster than colour bleed.
Turning Existing Cross Stitch into a Patch
Got an old piece sitting in a drawer? It deserves better. Add backing, stitch a border, trim carefully, and press gently. Suddenly, that forgotten project becomes a wearable statement. This is how many people end up designing patches for bomber jackets, hoodies, and bags.
How Do You Stop a Patch Falling Off?
Iron-on backing is fine for light use. Sewing is king for longevity.
- Use whip-stitch or blanket-stitch
- Avoid high-movement areas like elbows
- Match attachment method to fabric type
If this feels like effort, that is because it is. Which is why many people eventually look for where to get custom patches made with professional attachment options like Velcro or heat seal.
How Much Do Custom Patches Cost Compared to DIY?
DIY patches are cheap in materials but expensive in time. When ordering professionally:
- Bulk orders reduce cost per patch
- No setup stress
- Consistent quality
If you are wondering how much do custom patches cost, the answer depends on size, style, and quantity. But for businesses, clubs, and events, cheap custom patches with no minimum from a trusted supplier often make more sense than stitching for weeks.
DIY vs Professional Patch Makers
DIY is perfect for personal projects and creative therapy. Professional patch makers are ideal for:
- Custom military patches UK
- Custom biker patches for jackets
- Custom team patches for sports uniforms
- Corporate logo patches UK made
- Promotional patches for brand marketing
If you want to skip the needle and still get something unique, this guide on Get Custom Design Patches to Match Any Outfit or Style shows how easy it is to design and order without compromising creativity.
Frequently Asked Questions
Can I Make a Cross Stitch Patch at Home Easily?
Yes. With basic supplies and patience, beginners can make small patches at home without trouble.
Are Cross Stitch Patches Durable?
They can be, if finished properly with strong backing and secure stitching.
Is It Better to DIY or Order Custom Patches?
DIY is great for one-offs. For bulk, branding, or time-sensitive needs, ordering from the best patch makers in the UK is smarter.
Can Cross Stitch Be Used for Business Branding?
For small-scale or artisan brands, yes. For larger runs, professional custom patch factories deliver better consistency.
Final Stitch
A cross stitch patch is more than fabric and thread. It is time, intention, and personality sewn together. Make one for fun. Make one to learn. But when you need volume, speed, or polish, working with a UK#1 Custom Patch Manufacturer saves effort and delivers results.
Whether you are a creator, a club organiser, or a brand looking to stand out, there is a place for handmade charm and professional precision. And knowing when to use each? That is the real craft.